
Task recorder in Microsoft Dynamics 365 is a tool used to record business processes for documentation, training, testing and automation. It can be used for below purposes:
1. Recording Business Processes – It can be used to record business process end to end.
2. Creating User Guides – The recordings created using it can be used to create user guide.
3. Playback and Task Guide Mode – The recording created using task recorder can be played again as a guide to users for step by step process with in Dynamics 365 F&O.
Chrome extension for D365 task recorder
Chrome extension: Dynamics 365 F&O Task Recorder Screenshot
Just install this extension in your browser and you will see ‘Capture screenshots‘ options when you will create a new recording via task recorder.
Step by step document with screenshot in Dynamics 365 F&O using Task recorder
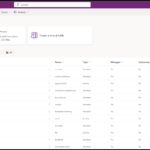
Step 1: Open home screen of your Dynamics 365 F&O, in the upper right corner you will see a setting icon as shown below.

Step 2: Now click on setting icon, now you will see a list and now click on ‘Task recorder’ as shown below.

Step 3: Now a new form will open as below, click on ‘Create recording’

Step 4: Now you will see a screen as below, give a name and description of the recording and make sure you click on ‘Capture screenshots’ as this is coming because of the chrome extension we installed in previous steps.

Step 5: I have filled as below and click on start

Step 6: Once you click start, it will start to record every task/click you do in the system, once all the steps are done just click on stop.

Step 7: Once you have clicked on stop button, now you will see a new form as shown below,

Through this form you can export the steps as word document and screenshots will be there in your document.
You can also check out my previous blog on browsing tables in D365: D365 table browser
Need help? Connect Atul
His proficiency in Azure integration further distinguishes his capability, facilitating seamless connections with Dynamics 365 F&O and enhancing business operations. Committed to project success, he provides ongoing support and shares industry insights through his blog, contributing to the professional community's growth.
- Key Vault parameters in Dynamics 365 F&O - July 29, 2025
- User-based authentication RSAT - July 22, 2025
- Boost First-Load Performance in Dynamics 365 F&O with IIS Preload - July 15, 2025
If there was an option to highlight the selected area in the taken screenshot then it could be a wonderful but never the less this is also very great option to prepare a repro doc in few mins.
Thank you
Agreed 💯 , highlighting would have enhanced the clarity
You’re most welcome